KunAnimations - Setup Interactive Animations
🍺Hello Everyone :D
Since a long time I wanted to look for a workaround to help me combine animations and interactive scenes with the popular engine of RPG Maker MV.
KunAnimations Plugin allows the user to use pictures as interactive animations and automated behaviors, including randomized chained animations and events.
- Import pictures containing a spritesheet of frames by columns and rows
- Define custom animation layers containing the framesets to play, with different animation behaviors.
- Register different hotspots per layer to allow the user to click and interact, updating game variables and triggering chained and random animations from other layers.
- Add custom sound effects to play with each layer.
- Handle all the interactive engine with a clean set of commands, allowing to update and switch animations, assign picture aliases and toggling the interactive controls at will.

ℹ There are great sprite animation editors such as ASEPRITE or LIBRESPRITE to create your own animated pictures, but you may even use your DAZ rendered animations to build your frames.
It's as easy as export the spritesheets and place them in the img/pictures folder so you can open KunAnimations plugin to create a scene for such picture.
⭐Install and Setup
As any RPG Maker MV/MZ plugin, just place KunAnimations.js in the js/plugins folder, then add it from RPG Maker MV Plugin Manager.
Be sure to set the status to ON (Activated)
ℹ Remember to install and activate KunSoundBanks plugin if you wish to enable the animation sound effects.
⭐Main Setup
- Debug Mode: Activate console output while testing the game to track dev info and the plugin behaviour. Also is required to use the capture mode so you can register interactive hotspot coordinates. Use the Log Trace option to throw more sensitive information from the animation setup while testing your game.
- Master Frame Time (FPS): Base Frames Per Second used in the animations. You can customize it later per Picture and FrameSet
- Touch Counter Variable: Assign a variable to count how many hotspots are in the queue.
- Touch Limit Variable: Assign a variable to set the length of the hotspot queue.
- Touch Mode Switch: Assign a switch to track in the game when the interactive mode is enabled or disabled.
- Touch X Var: Assign a variable to capture the clicked hotspot X coordinate
- Touch Y Var: Assign a varuabe to capture the clicked hotspot Y coordinate.
- Default Touch SE: Sound Effect to play when the user clicks over a valid hotspot.
- Animation Scenes: Select the pictures you want to use as SpriteSheets and configure the scenes.
- Sound Banks: Create a list of sound effect generators to play on specific FrameSets.
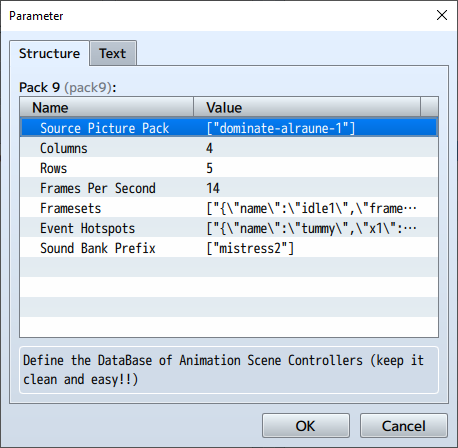
⭐Add an Animation Scene (Animation Controller)
Animations are binded to Pictures. You may setup the animated pictures just like other picture in the game while the animation engine will play seamessly the logics aside from the plugin with this configuration.
Each Picture in the list will load a number of frames and layers or framesets to animate. By defaut, the first frameset defined in the list will be the first animation to play when loading the picture.
- Bitmap Source: Pick your picture to animate. You may add more than one picture to handle them with the same animation rules.
- Columns: How many horizontal frames (cols) are defined in this picture?
- Rows: How many vertical frames are defined in this picture?
- Frames Per Second: Define the default FPS for this Picture. Can be customized later per FrameSet.
- FrameSets (Layers): Each frameset is an animation layer which can define custom logics to render the animation and specific interactions.
- Event HotSpots: define here the named spots you can click on the animation, registered with a set of 4 coordinates X1,Y1,X2,Y2 and some specific variables to update when clicked.
- Sound Bank Prefix: If you want to handle several pictures with this animation setup, you may want to give them different sound effects to each. When you define a Sound Bank Prefix, this name will be attached before the sound bank you call in each Animation Layer.
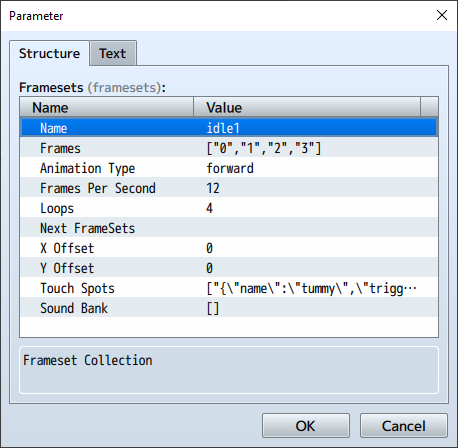
⭐Create an Animation Layer (FrameSet)
- Name: Define an unique name for this layer
- Frames: List here all frames to play from the picture, starting from the zero frame.
- Animation Type: forward, backward, ping-pong, static.
- Frames Per Second: Custom fps for this single animation. Leave it to 0 to get it from the main configuration.
- Loops: How many times will loop this frameset? Leave it to 0 to loop it infinite.
- Next Framesets: if there's a finite loop, at the end of the animation, the plugin will play another frameset layer from this list.
- X Offset and Y Offset: Set a static offset for this frameset, so the picture will offset by these coordinates when you move the image from RPG Maker editor. Great for moveable or cursor images.
- Sound Bank: Which sound bank to play when this animation runs.
- Touch Spots: Define here a list of interactive touchable spots for this layer. You need to register the required Event HotSpots in the Animation Controller.
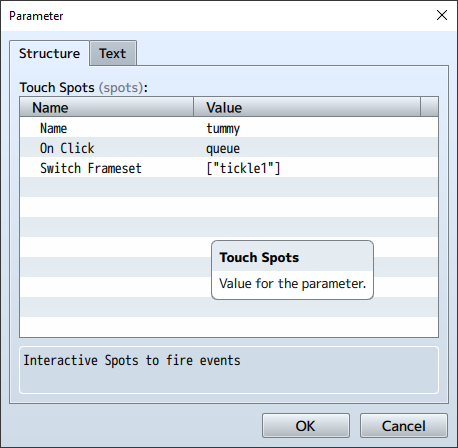
⭐Make an animation interactive I - Adding TouchSpots
Each Layer or FrameSet may contain a specific range of hotspots to interact with, each one with its own behaviour.
- Name: Unique name for this TouchSpot
- On Click: How will this hotspot be triggered. Add to a hotspot queue, run instant, ignore, or capture frame.
- Switch FrameSet: if you click this hotspot, it will randomly change to one of these new frameset layers.
⭐Add a Sound Bank
A sound Bank will play a random selection from the list of SE, providen a specific set of custom parameters, such as pitch, pan and volume, which will be triggered in specific events of the interaction.
- Name: Unique name of your soundbank
- Chance: chance to play, from 1% to 100%
- Interrupt other SE: Stop any other SE playing when this selection is about to be played by te media manager.
- Sound Effect: List of sound effects to pick a selection from. Add more than one to let the engine choose a random sound effect.
- Pitch: modulate the sound effect's pitch. Set a specific pitch with just one value, let the engine random among two values, or make a selection from 3 or more values.
- Pan: set the spatial volume of the sound effect. Use one to fix the pan, two to randomly interpolate amongh the values, or more than two to allow the engine pick a value to pan the output.
- Volume: set the sound volume. Set a fixed volume with just one value, two values will interpolate the volume min and max, and more than two will pick a random volume value to play the selection.
ℹ SoundBanks are now handled with an optional plugin. If the animation finds the SoundBank plugin active, it will request the required sound profile from it.
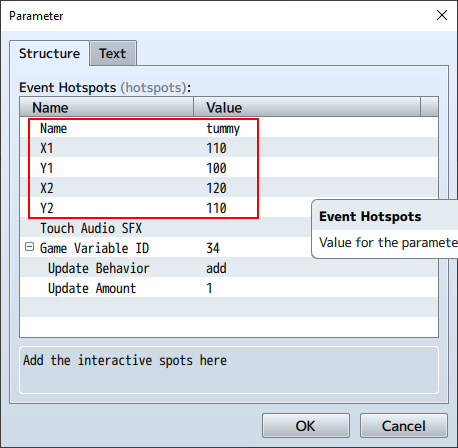
⭐Make an animation interactive II - Registering Event Hotspots
- Name: Unique name for this HotSpot
- X1 Y1 X2 Y2: Define here the coordinates of the interactive hotspot area. These are relative to the image, handling absolute position and scale for you ;)
- Update Behaviour: Update a variable when clicked with: add, substract, set, set from frame, ignore
- Game Variable ID: Set the game variable to hold the updated value.
- Update Amount: how many points will update the variable
- Touch Audio SFX: Play a single Sound Effect when clicking over this hotspot.
Now if you have designed and defined your animation logics within the plugin, you may just use the picture event command in any Event Page so you can start playing it 😃
- But, how to manage the Animation Layers from the event pages and handle the interactive events now? 🤔
- We can do it easy through the Plugin Commands 👍🏼
⭐KunAnimations Plugin Commands
Here's the list of commands you can use for your events in RPG Maker MV. Wherever you add a picture which has a scene defined in the plugin setup, it will automatically start playing the first Animation Layer, then you can use these commands to update and change the animations, or even activate the interactive events to allow the plugin move through the logics you've defined for each animation.
⭐Animation Control
▶ KunAnimations set picture-name [animation-layer] [wait] [frames:offset-random-frames]
- Switch manually to another Animation Layer (FrameSet) within the picture-name picture setup.
- Use the animation-layer parameter to define the Frameset you want to play
- You may use also the wait command to define a number of frames to wait before the event interpreter continues with your next events.
- Define offset-random-frames to add a random offset from frames to offset-random-frames, so you make the waiting elapsed time a bit more dynamic.
▶ KunAnimations reset picture-name [replay]
- Reset the animation for picture-name to the first Animation Layer and initialize the animation.
- Use replay to automatically replay the animation from the beginning.
▶ KunAnimations fps picture-name [fps] [import]
- Define the frames per second for the current animation playing for picture-name
- Set the import tag to get the FPS from a Game Variable instead a static number. FPS will be used as the game variable ID
▶ KunAnimations pause picture-name
- Pause the playing animation for picture-name
▶ KunAnimations resume picture-name
- Resume the current animation for picture-name
▶ KunAnimations wait [frames:elapsed-frames]
- Wait for elapsed seconds before running the next routines in the event editor
- Add random elapsed-frames to define a randomized timespan
⭐ Interactive Control
KunAnimations mode [ capture | touch | disabled ]
- touch: Activate the interactive mode. When this flag is set, the player can interact with the defined hotspots of the animated pictures in the scene.
- capture: This is a developer mode command, which will help the programmer to setup a test scene to define the area coordinates to create TouchSpots. Will be detailed later in more examples.
- disabled: Disables and ignores the interactive logics for the animated pictures.
KunAnimations target [random]
- Gets the next touched spot in the queue (TouchSpot must be run with a queue behaviour) and runs the defined animations and logics.
- If Touch X Var and Touch Y var are defined, the touched coordinate will be exported to such Game Variables so you can bind more events with that coordinate, such as moving a picture over.
KunAnimations alias [alias-name] [picture-name]
- Define an alias for a picture-name.
You may want to swap pictures in the event editor eventually while playing an animated scene. If you want to create different animation variations you could simply import 2 or more pictures with the same attributes, width, height, columns and rows, so you could change them as you need to progress with the scene. With an alias you can ease the use of the plugin commands registering with this option the current picture-name being played, which you may want to define close to the call of the show picture event on the event editor. This option will prevent you to attach more logics in the event editor and keep the scene clean and under control 😉
KunAnimations clear [targets | alias |all ]
- targets: remove all clicked TouchSpots in the queue.
- alias: clear all defined aliases
- all: clear everything
Clear all touched spots in the queue and optionally, removes all aliases created for a scene. This is a good practice for the scene when it's about to end, or when you need to setup different stages within the interactive flow.
⭐How to register interactive spots using RPGMAKER MV Scene
Create a common event you can call running the test command (or CTRL+R) in the event editor and fill it with a code to handle the hotspot capture. You may use a code like this:
◆Comment:######################################################
◆Label:SETUP
◆Show Picture:#2, dominate-alraune-1, Upper Left (300,100), (200%,200%), 255, Normal
◆Comment:use an alias if required to handle it easy
◆Plugin Command:KunAnimations alias alraune dominate-alraune-1
◆Loop
  ◆Comment:define a capture timespan so you can define rect areas using mouse drag-drop over a spot
  ◆Plugin Command:KunAnimations mode capture
  ◆Wait:400 frames
  ◆Comment:when the timespan is done, disable capture mode to show an option menu to select next poses
  ◆Plugin Command:KunAnimations mode disable
  ◆Show Choices:Idle 1, Idle 2, Idle 3, Quit (Dim, Right, #1, -)
  :When Idle 1
    ◆Comment:if your animation  have different hotspots, define pose selection to handle hotspot creation
    ◆Plugin Command:KunAnimations set alraune idle1
  :When Idle 2
    ◆Plugin Command:KunAnimations set alraune idle2
  :When Idle 3
    ◆Plugin Command:KunAnimations set alraune idle3
  :When Quit
    ◆Break Loop
  :When Cancel
  :End
:Repeat Above
◆Jump to Label:EXIT
ℹ To create a hotspot output, is important to enable debug mode and open the debug console (F12).
Each time you drag over a spot area with the capture mode on, you'll get the coordinate definition in the debug console.
Get those coordinates and fill them in the scene's event hotspots. Hotspot names must be unique.

⭐Preparing the scene
Now with the animation registered in the plugin, anytime you want to add the picture you've added to the animation manager, it will play by default the first animation frameset. If you added more random animations on the next animations to play within the first animation layer, you'll see how the animation jumps to the next one as it completes the loop count and behaviours.
Using animated scenes is easy now and you may change manually in the scene manager by using the KunAnimations command:
KunAnimations set picture-name layer-name
ℹ You may even set a wait pause to watch the animation and pause the event interpreter for a while like this, adding a static number of frames, or even add a random extra offset of frames.
KunAnimations set picture-name layer-name wait 400:100
ℹ Moreover, you can define an alias to name the picture or select among different pictures with the same animation controller, so you don't have to add more logics in your event.
KunAnimations alias my-alias long-tedious-picture-name
KunAnimations set my-alias layer-name wait 400:100
⭐Now, let's prepare the event to play an animated picture!
That will depend on how do you want to handle these animations in the defined Animation Layers of your picture.
You can make them run alone following the rules you defined in the animation setup.
But...
how do you interact with such animations?😵
Interactions are defined in the Animation Layer TouchSpots, remember you were able to define:
- Ignore: click events won't change the animation
- Next Frame: get the next frame of the animation
- Instant: create an interaction effect NOW
- Queue: add the clicked spot and coordinates to a hotspot queue so you can control the process.
The three first options are immediate, no more events required but just place your picture in the event editor, and then keep a loop to run the animation until a defined condition is met in your logics (countdown, game variable amount, switch ... your way)
◆Comment:######################################################
◆Label:LOOP
◆Show Picture:#2, dominate-alraune-1, Upper Left (300,0), (200%,200%), 255, Normal
◆Plugin Command:KunAnimations mode touch
◆Control Variables:#0014 COUNT_DOWN = Random 10..14
◆Loop
  ◆If:_TOUCH_STAGE < 2
    ◆If:DOMINATION_POINTS ≥ DOMINATION_LEVEL
      ◆Jump to Label:UPDATE
      ◆
    :End
  :End
  ◆If:COUNT_DOWN > 0
    ◆Control Variables:#0014 COUNT_DOWN -= 1
  :Else
    ◆Break Loop
  :End
  ◆Wait:60 frames
:Repeat Above
◆Jump to Label:OPTIONS
The queue one is a bit more tricky though.
If you want to gain the control of what happens on the clicked hotspot, you need to handle the queue method with the target plugin command:
KunAnimations target
Use the random option to get randomly one of the clicked spots available in the queue:
KunAnimations target random
Then, you may need to create an specific logic in the Event Editor to handle such queue, which you may want to use, for example, to move another picture over the touched hotspot, just like a cursor.
Here is an approach:
◆Comment:######################################################
◆Label:LOOP
◆Play SE:Recovery (90, 80, 0)
◆Plugin Command:KunNotifier Tickle her!!!
◆Plugin Command:KunAnimations mode touch
◆Control Variables:#0014 COUNT_DOWN = Random 4..8
◆Loop
  ◆If:_TOUCH_GAUGE > 0
    ◆Jump to Label:TOUCH
    ◆
  :End
  ◆Wait:40 frames
  ◆If:COUNT_DOWN > 0
    ◆Control Variables:#0014 COUNT_DOWN -= 1
    ◆
  :Else
    ◆Break Loop
    ◆
  :End
  ◆
:Repeat Above
◆Jump to Label:OPTIONS
ℹ This code will watch for the value of _TOUCH_GAUGE variable, which is the Touch Counter Game Variable we define in the KunAnimations main setup. This variable is handled by the animation controller to count the interactive spots touched in the queue, and will be updated every time you call the target command described above.
When there's a spot in the queue, the event interpreter will jump to the TOUCH label, so it will resume with a code block like this:
◆Comment:######################################################
◆Label:TOUCH
◆If:_TOUCH_GAUGE > 2
  ◆Comment:get a random spot from the list
  ◆Plugin Command:KunAnimations target random
  ◆
:Else
  ◆Comment:get the first spot in the queue list
  ◆Plugin Command:KunAnimations target
  ◆
:End
◆Comment:POSX and POSY coordinates will be filled by the target command
◆Show Picture:#6, _cursortest, Upper Left ({POSX},{POSY}), (100%,100%), 255, Normal
◆If:SCORE ≥ LEVEL
  ◆Comment:if there are enough points to change or complete the scene we'll move to another block
  ◆Jump to Label:UPDATE
  ◆
:End
◆If:_TOUCH_GAUGE > 0
  ◆Comment:if there are yet some spots in the queue, let's try it again
  ◆Jump to Label:TOUCH
  ◆
:End
◆Comment:once there are no more spots in the queue, let's just go back to the loop block
◆Jump to Label:LOOP
What's going on here?
- There are clicked spots in the queue, so we want to get one of them. A random one if there are more than just 2 spots, otherwise, it will get the first spot in the list.
- Every time we call the KunAnimations target command, the Game Variables used to capture the X and Y coordinates we click on will be filled with the queued clicked spot coordinates. this way, we can do something in such position with the next events.
- We want to place another picture over such X and Y clicked spot, so we use the POSX and POSY Game Variables with the recently updated coordinates to show the picture.
- We can track a control on other Game Variables. If we click on such spots, they will update a Game Variable named SCORE. When such variable reaches a LEVEL value, we can move to another block to evaluate the result and change the scene or complete the animation.
- Otherwise, we keep running through the hotspot queue, if there's any other spot left to process, so we jump back again to the TOUCH block to repeat the process.
- When there are no more spots to process, we can now go back to the idle status, in the initial LOOP block section, where we may reset the animation to a waiting stance if required.
From here' the options you can handle to create your own animated and interactive scenes are endless... 😉
It will depend on how to plan the touch events and the animation layer hierarchy, so you can build more living and interactive animations!
⭐ KunAnimationPacks
What happens when you want to add tons of animations to your game? Well, it's unpredictable, but it often may blow up something.
I had some issues and CTD in RPG Maker MV when attempting to register many animations in my projects, because several of these were complex interactive animations with lots of framesets. I like to live to the limit! 💪🏼
ℹ KunAnimationPacks is an extension of KunAnimations which will allow you to register more and more animations and interactive animations separated in collections.
When this plugin is active, KunAnimations will attempt to read all animation collections in, just like they were defined in the source KunAnimations plugin.
This way I was able to fix my CTD issues when too many interactive scenes. Maybe it would be handy for you too 😄
😄Feel free to give feedback or comment below for any question or bug you may find.
Files
Get Kun Plugin Workshop for RPG Maker MV
Kun Plugin Workshop for RPG Maker MV
RPG Maker Plugins
| Status | In development |
| Category | Assets |
| Author | JayaKun Zone |
| Tags | javascript, plugins, rpgmakermv |
More posts
- KunPlugins Update!Jan 15, 2025
- Added KunHirelings and KunGuestsMay 17, 2024
- Quick tutorial with RPG Maker MV plugin setupSep 10, 2023
Leave a comment
Log in with itch.io to leave a comment.